• Skip to primary navigation
  • Skip to main content
  • Skip to primary sidebar
Prairie to Fork Farm Website Header Image for Studio Pro Jessica Theme

Prairie to Fork Farm

Practicing Regenerative Farming, Producing Wholesome Food, Finding Joy in the Journey!

  • ABOUT PRAIRIE TO FORK FARM…
    • ABOUT PRAIRIE TO FORK FARM…
    • Contact Us
  • AROUND THE FARM BLOG
    • Grass-Fed Beef
    • Pastured Poultry
    • Fencing & Water Supplies
  • Shop Prairie to Fork Farm
    • Pasture Raised Pork – Whole Hog Reservation
    • 100% Grass-fed Ground Beef
    • Pasture Raised Lamb – Whole Lamb Reservation

Around the Farm Blog

IDEAS FOR CHOOSING THE “BEST” FENCE FOR CATTLE (AND SHEEP)

April 28, 2024 Leave a Comment

There are many factors to consider when choosing the “best” fence for cattle on your farm.  When planning to install new fence on your farm, take into account: durability, ease of installation, cost, versatility, and aesthetics. We will consider all of these factors when looking at the different types of fences for your farm. In general the best cattle fence will have a perimeter fence height of 4 feet. This height insures that the cattle remain safely inside your fence.

Pintrest pin design for choosing the best livestock fence featuring pictures for electric fence, woven wire fence and split rail wood fence.

Ideas for choosing the best fence for cattle on your farm includes…

  1. WIRE FENCING
    1. Woven Wire Fence
    2. Welded Wire Fence
    3. Barbed Wire Fence
    4. Electric Fences
  2. WOOD FENCING
    1. Split Rail Wood Fence

WIRE FENCING

There are many different types of fencing. Let’s take a look at the pro’s and con’s of the four most popular types of wire fencing. These four types include: woven wire fence, welded wire fence, barbed wire fence, and electric fence. 

Woven Wire Fence

Woven wire fence is usually constructed from galvanized steel wire that is woven together both horizontally and vertically. 

picture features a woven wire fence with a black and white calf in the background.

The Pro’s:

  • Durability: If the fence is properly installed and galvanized, it should last 20 years.
  • Versatility: Woven wire adds some flexibility to the fence. It can keep small animals as well as large animals inside the fence. It is also good for keeping predators on the outside of your fence.
  • Aesthetics: This fence does look very nice when it is installed properly.

The Con’s:

  • Durability: This is also a con. For instance, if a tree falls on it, you will need to replace the fence section.  Also, wildlife such as deer moving through your property may damage it while trying to jump over it.
  • Ease of installation: Woven wire fence takes the longest to install. It requires the most maintenance of the different wire fence types. It is not great for stony or hard ground since you will need to install larger posts at closer intervals. Once posts are set, you will need to thoroughly pack the soil around the posts.
  • Cost: $$$ – When combining the cost of materials and labor, this is a more costly type of wire fence comparatively. Fence posts should have a minimum length of 6 feet and driven to a minimum depth of 24 inches.  The maximum spacing of the wood post should be 16 feet. The height of most woven wire fencing ranges from 26 to 48 inches.  For cattle, you will want to go with 48 inches.

Welded Wire Fence

Welded wire fence is welded together in a grid pattern. This rigid metal mesh panel is made of galvanized steel, high tensil wire.  Cattle panel fence is a type of welded wired fence. Cattle panel fencing is a good choice for larger animals because it is made from a more heavy duty material. 

picture features a welded wire fence with a brown horse in the background.

The Pro’s:

  • Durability: Thicker wires must be used to withstand the welding process.  It is more rigid than woven wire fence, so, it makes it a good choice for a durable fence.
  • Versatility: Depending on the size of the squares, it can keep smaller animals and is also a durable cattle fence. It works well for keeping predators on the outside of the fence. 
  • Aesthetics: This can be a nice looking fence depending on the materials you use to install it.

The Con’s:

  • Durability: If it is well maintained, it can last 10 to 15 years. Which makes it less durable when comparing it to other types of fence. It is also susceptible to rust.
  • Ease of installation: Installing welded wire fence is time intensive.  The wooden posts need to be closer together. Install them with gravel in the bottom of the hole so the posts do not rot. You will need to add staples along the top and bottom rails as you stretch the wire.
  • Cost: $$$ – The cost of a welded wire fence is the most expensive type of wire fence. One reason is because of how many wooden posts you will need. Place your wood posts on average 7 to 8 feet apart and bury them 2 feet in the ground. So, eight foot long posts are a good choice. It is also best to add a bottom and top rail for stability. 

Barbed Wire Fence

Barbed wire fence is an iconic, common, proven fence of choice for livestock fencing that has stood the test of time.  The wires contain sharp, metal points along it that are spread between metal t-posts. This is a great option because it does do a good job of keeping your livestock inside the fence.

picture featuring a barbed wire fence with brown cows in the background.

The Pro’s:

  • Ease of installation: It is easier, takes less time, and less laborious to install a barbed wire fence comparatively to the previously mentioned choices. It is also more light weight than the previous two types of fence and one person could install it alone.
  • Cost: $$ – It is less expensive than woven or welded wire.

The Con’s:

  • Durability: Barbed wire requires frequent maintenance. Especially in regards to a tree falling on it or breakage from a wild animal running through it. You can expect it to last on average 15+ years.
  • Versatility: Barbed wire is a good choice for horse or cattle fencing. However, it will not keep in sheep, goats, pigs, or guardian dogs.
  • Aesthetics: Barbed wire fence is not aesthetically pleasing as it is mostly utilitarian.

Electric Fences

In our opinion electric fence is the best type of fence. It fits our specific needs on our regenerative farm for many reasons.  There are different electric fence types.  You can use a single strand for a temporary fence or five or more strands for a perimeter fence. Some use metal posts or t-posts with insulators. Another type of electric fence, such as Timeless Fence, uses rigid PVC posts. You can use poly-braid wire or high-tensile galvanized wire.

We did our research when looking at different farm fencing options. We needed to replace our old barb wire fence that had wooden fence posts and t-posts. Timeless fence is what we decided was the best option to fit our needs. Timeless Fence fits our needs so well that we are now an authorized reseller for Timeless fence.  This is not just a type of cattle fence. Electric fencing works for all sorts of livestock, including: pigs, lambs, goats, horses, livestock guardian dogs, as well as cattle. If you want a free sample kit, click here.

Picture features a Timeless Fence with white posts and black cows in the pasture.

The Pro’s of Timeless Fence:

  • Durability: Timeless Fence posts are made from rigid PVC which makes is almost impossible to break under normal use.  It absorbs impact and bounces back. The posts will never rust or rot and it is weatherable because it is UV protected. So, the life expectancy is 40+ years! 
  • Ease of Installation:  Timeless Fence posts pound like a steel post and are pre-drilled every three inches. The pre-drilled holes make it ideal for installing electric wire as there are no insulators needed. The post is the insulator! You can thread high-tensile wire and poly-brade directly through the post for an extremely strong, virtually maintenance-free fence.  This greatly reduces installation time! Farmers and ranchers across the USA and around the world can use their extra time doing productive tasks, not fence repair!
  • Cost:  $ – Timeless Fence systems are eco-friendly and a cost-effective alternative to traditional steel t-posts and wood fence posts. When we did the math a Timeless Fence system was the most cost effective for our purposes.  Increasing post spacing on flat ground can really help to reduce cost. See this publication that compares the different types of fence systems.
  • Versatility:  Timeless Fence has various purposes. They come in different heights with holes drilled every three inches. This makes it the best fencing as far as versatility. Whether you plan to contain one type of farm animal or multi-species of farm animals. You can use it for perimeter fencing with more wires at different heights or interior fencing with less wires.  You can successfully use it for many different livestock, such as: pigs, lambs, goats, horses, cattle, and many others.  It has even kept our livestock guardian dogs contained with the sheep!  Using electric fence is also superior at keeping out unwanted predators such as coyotes, random dogs and even bears!
  • Aesthetics:  Timeless fence posts have a satin-like appearance that maintains its new look for many years.  It happens to look beautiful along our property. We love driving down the road seeing all the white posts along the farm, it looks so idyllic.  If white is not for you, you can choose a warm-brown color.

The Con’s of Timeless Fence:

  • Durability:  If you live in an area with prescribed burns, such as Kansas, you will want to manage excessive vegetation around the posts. Fire will weaken and darken the posts. You can get around this by mowing or intensively grazing the pasture borders late in the grazing season.
  • Versatility:  There is the unpleasant possibility of the farmer or rancher having a “shocking” experience. 

WOOD FENCING

Wooden farm fence is a common choice when you are weighing heavily on the factor of aesthetics.  Let’s take a look at split rail wood fence. 

Picture features a split rail wood fence with a red barn in the background.

Split Rail Wood Fence

The Pro’s:

  • Aesthetics:  A split rail wood fence adds rustic charm to your farm and creates a welcoming atmosphere. It is the right fence type if aesthetics is your top priority.

The Con’s:

  • Durability:  If you want your fence to be more durable you should consider the type and quality of wood used.  Ideally use a hardwood such as oak or cedar. Hardwood will be more resistant to rotting when compared to softer woods like pine. Additionally, you should plan to paint or stain the wood every few years to help keep the wood from weathering. The lifespan of your fence will decrease if you don’t take this extra step. If you live in an area with high humidity or frequent rain, your fence is more prone to moisture damage and decay.  Wood fences can last anywhere from 10 to 20 years.
  • Ease of installation:  A split rail wood fence will take more time to install when comparitively.  Set the posts deep enough into the ground and add concrete footings. This aids in stability and will help prevent water accumulation around the base of your fence.
  • Cost:  $$$$ – Since farm fences usually cover long distances, using a good durable wood will not be feasible for many people. You should also consider maintenance as an additional cost. Re-staining or painting the fence every couple of years will cost more compared to wire fence. Also it will also cost you precious time.
  • Versatility:  When taking versatility into consideration, you will mostly likely only be able to keep in larger farm animals. But this depends on how far apart you place your boards.

This idea guide should give you a good start in determining the best fence for cattle (or other livestock) on your farm.  When choosing the right type of fence for your farm, there are many factors to keep in mind. Consider factors such as:  durability, ease of installation, cost, versatility, and aesthetics. How you weigh these each of these options, as far as what is most important you, will vary from farm to farm.  Also keep in mind the type and size of your livestock. Factor in the number of different livestock animals you care for. Are you caring for one species or multi-species of livestock? Finally, consider all the “extras” you may need to purchase in order to install and maintain each type of fence. 

Deuteronomy 28:4 Blessed shall be… the fruit of your ground and the fruit of your cattle, the increase of your herds and the young of your flock.

HOW MUCH COOP AND RUN SPACE DO MY CHICKENS NEED?

April 22, 2024 Leave a Comment

You may be asking yourself, “how much coop and run space do my chickens need?” Seeing those cute little chicks at the farm store can beckon you to make an impulse buy. Keeping backyard chickens is an exciting adventure! However, this is a great question to ask yourself before you purchase those cute baby chicks. Before you purchase your birds, you need to consider how you are going to house them. 

3 chickens inside of a coop

This post contains affiliate links, as an Amazon Associate I earn from qualifying purchases at no extra expense to you. See my full disclosure here.


In this post you will learn:

  1. Important Questions to Ask Yourself
  2. How Much Coop Space Do My Chickens Need?
    1. The Bare Minimum Square Feet of Indoor Space You Need
  3. How Much Run Space Do My Chickens Need?
    1. The Bare Minimum Square Feet of Outdoor Space You Need
  4. How Much Roost Space Do My Chickens Need?
    1. The Number of Lineal Inches of Roost Space You Need
  5. How Many Nesting Boxes Do My Chickens Need?
    1. Amount of Nesting Boxes You Need
  6. A Few Other Things to Consider When Picking the Perfect Coop and Run Space
  7. A Note on Deep Bedding
  8. Finally

Important Questions to Ask Yourself

Some of the most important questions you will want to consider ensure your chickens have enough space to be happy and healthy are:

  • Do you plan to keep them cooped up full time with an outdoor chicken run or will you let your chickens free range?
  • What is the bare minimum square feet of space for your coop?
  • If you already have a coop, what is the square feet of that coop space?
  • What is the bare minimum square feet of run space you will need?
  • What is the number of chickens you plan to keep?
  • What type of chicken breed do you plan to keep? Small, medium or large breed?
  • What is the temperament of the breed you plan to keep?
  • What is your climate? Do you have hot summers and cold winters?
  • How much roost space you will need?
  • How many nest boxes you will need?
  • Do you have access to clean water or will you have to haul it?
  • Do you have access to electricity?

How Much Coop Space Do My Chickens Need?

First, let’s consider the size of your coop in order to make sure your chickens have enough room to be happy and healthy. The size of coop you choose will determine the size of your chickens and how many chickens you can keep. 

If you already have a backyard chicken coop, measure it to find the square footage.  This will pre-determine the amount of chickens you can keep. Other things you may need to consider with this option is if you will need to add roosting bars and nest boxes or an outdoor run.  If you need to add any of these features, it will naturally have an added cost. 

If you want to “press the easy button,” there are many pre-fab backyard chicken coops available. Some of them even have nest boxes and run space included. These tend to be on the smaller side and will really limit the amount of chickens you can have.  They also tend to be fairly lightweight.  This can be a positive if you want to move your coop around or a negative if you live in an area with high wind. You should anchor it down if this is the case.  You can also find handy pre-made coops that are on wheels made to move around your yard.

If you plan to build one, there are many great books and websites that offer you plans and supply lists. In general, these types of coops are more stationary.  However you can custom build a coop that is made to move around your yard.  These types of coops will most likely be made from more heavy duty materials.  Also another thing to consider if you choose this option is to build it in such a way that you can use deep bedding (see note below). In this case you may want to think about not having it anchored to a foundation so you can move it off to clean it more easily.  

The Bare Minimum Square Feet of Indoor Space You Need

You will want to offer plenty of space for your hens to be happy and healthy. Overcrowding can cause your chickens to be stressed, exhibit aggressive behavior, pecking, parasites, or even egg laying problems.  Another thing to consider is if you have a rooster(s), you will want a bit more indoor space.  Roosters tend to chase the hens around so you will want to give the hens plenty of room to get away from the rooster if she wants to. A good rule of thumb for coop space for standard chickens is 5 square feet of floor space.  This will give them adequate space to be happy and healthy.

  • For small breeds of chickens (ie. Bantams, Silkies, or Serama), the minimum amount of space is 2 square feet of floor space per chicken.
  • For medium-sized chickens (ie. Australorp, Rhode Island Reds, or Plymouth Rock), the minimum amount of space is 4 square feet of floor space per chicken.
  • For large breeds of chickens (ie. Jersey Giants, Buff Orpingtons, or Cornish Game), the minimum amount of space is 6 square feet of floor space per chicken.
  • Here is a handy chart to help you decide on your chicken breed.

How Much Run Space Do My Chickens Need?

Chickens in outside chicken run with electric poultry netting

You will want to offer plenty of outdoor space for your chickens to get fresh air, sunshine, and to forage for bugs. A few things to consider when thinking through this outdoor area is if you are going to cover your outdoor run or not, providing shade, or perhaps if your chickens will be free-range.

First, let’s take a look at the benefits and drawbacks of covering or not covering your outdoor run.  We have always used electric poultry netting for our outdoor run.  This has its benefits and drawbacks.  The benefits are that the poultry netting is a fast and inexpensive way to build a chicken run.  Another benefit is that it is easily movable to guide the chickens to different parts of your yard.  Finally, the poultry netting detours predators from getting in and chickens from getting out.  

One drawback to poultry netting I will note, this would apply to any open fence, is that when it is in the open, your chickens become an easy target for hawks.  We once had this problem and didn’t know what was killing the chickens until we saw it happen one day.  When we figured it out, we moved the fence under a tree for cover and shade.  Then, the raccoons were able get in the tree via another tree and building that was nearby. They used them as a ladder to get down inside the pen.  Ugh! More dead chickens. If you choose an open chicken run, make sure to provide your chickens with some sort of shade or cover, maybe just not a shade tree that can be accessed from outside the pen!

A chicken run that is closed on the top can alleviate many of these problems.  One drawback would be that it adds additional cost to your initial setup.

You may want to have free-range chickens. There are positives and negatives to this option as well.  Free-range chickens can enjoy foraging for a wide variety of plants and bugs. However, this opens them up to predator attack during the day and possibly at night. We have found the hens wake up early and want to head outside. The coyotes and bobcats are still up hunting during the morning hours, so we have had to make them wait until later in the morning to get outside! Possibly you get home late one evening and don’t get them locked up in time, the raccoons can decimate a whole flock! Ask me how I know…

The Bare Minimum Square Feet of Outdoor Space You Need

  • For regular-sized chickens you will want to plan 8 to 10 square feet of personal space per bird.

How Much Roost Space Do My Chickens Need?

It is a natural instinct for laying hens to want a place to roost at night.  They will look for a high spot to do this, whether it be the nesting boxes or some other place where you do not want them to roost. So, provide them with roost bars to perch on at night.  Heavy breeds or fast growing meat chickens should not have a place to perch. They can cause fractures in their legs or hip joints from jumping down off the roost. 

A ladder type roost that is angled and leans against the wall is a good option.  For the roosting boards, a 2 x 2 inch board works great. Place the roosting boards 1 foot apart going up the rung and starting at 18 inches off the coop floor. Be sure not to use a thin, slippery, round material such as plastic or metal pipe as it will make it hard for your chickens to be stable when sleeping at night.

Another tip would be to secure your roost to the wall, however make it so you can remove the roost in order to easily clean the soiled bedding underneath.

The Number of Lineal Inches of Roost Space You Need

  • For regular-sized chickens you will want to plan on 6 to 8 lineal inches of roost space per bird.
  • For large chickens you may want to plan on 10 to 12 lineal inches of roost space per bird.

How Many Nesting Boxes Do My Chickens Need?

Chickens can be picky about where they lay their eggs, so you will want to think through this space in your coop. Chickens like to lay eggs in a private, clean, darkened space. Make the nesting boxes visible from the door, but away from the roost space. Do not place the nesting boxes on the floor or in high traffic areas as this can encourage egg eating. Something you do not want to get started as it is difficult to break this habit! Provide clean soft bedding in the boxes. You can even put a fake egg in there to help your new layers understand where to lay their eggs.  Make your own nest box, or perhaps, you can buy a fancy nest box that lets the eggs gently roll down to a safe space that you can easily gather from.

Amount of Nesting Boxes You Need

  • The general rule is 1 box for every 4-5 hens.

A Few Other Things to Consider When Picking the Perfect Coop and Run Space

You will want to consider the climate you live in.  If you live in a cold climate and access to outdoor space is limited, you will definitely want to increase the amount of indoor space your chickens have.  If you have hot summers, make sure the chickens have shade or a place to get out of the sun.

You will want to have access to electricity.  If you have cold winters, you will need a heated waterer so the water doesn’t freeze.  If you have hot summers, you may want to put a fan inside the coop for air circulation.

You will want to have easy access to clean fresh water.  Chicken waterers seem to get dirty fast and need to be refreshed every day! You will not want to haul water a long way on a frigid winter morning or during an evening shower.  

Don’t face your coop door or the chickens access door to the North.  I learned this the hard way one winter when there was a sheet of ice in front of the door, which made it difficult to access the coop with a heavy bag of feed on my shoulder.  If you can, it would be best to face your door to the South (If you live in the Northern Hemisphere).

A Note on Deep Bedding

I noted the option of creating a coop with deep bedding earlier when I mentioned building your own chicken coop. This is a good idea for those of you who have limited space or really anyone looking to decrease workload and increase the health of your chickens. Deep bedding helps to provide a clean, healthy, and an odor free environment for the chickens. When you are ready to clean it out, you have the added benefit of using the bedding material as compost.

Make the base of your chicken coop at least 24 inches high with something solid like sheet metal.  Then apply at least 8 inches of some sort of carbon bedding material. You do not have to add a floor to your coop as it works best to put the bedding down on the ground. The material can be sawdust, wood chips or perhaps straw (although this is not the best option unless you shred it first).  I prefer sawdust or fine wood shavings as it doesn’t clump and the chickens love scratching around in it.

When the chickens scratch and churn the material, they help to aerate the floor material. The chickens do all the work to clean their own coop!  If it is deep enough, it will be odor free. However, if it starts to smell just add a little more bedding material on top. Do not use hay as it has a higher carbon to nitrogen ratio that will cause more ammonia. Also do not use cedar or other aromatic wood as they have oils that are harmful to your chickens.

The deep bedding method also reduces pathogens from taking over. As the chickens scratch around in the bedding material, it helps to aerate it. This process helps to control the pathogens.  The “good bugs” eat the “bad bugs”. When you need some compost for your garden, you can move aside the top layer and scoop up the rich bottom layer to spread on your garden.  The deep bedding method also works great in an outdoor chicken run space.  It is low maintenance because you may not need to clean it out but once every 1 to 2 years. 

Finally

When planning to raise backyard chickens, you will ensure success by first making sure they have adequate space to thrive.  Your flock will be happy and healthy, which will make you happy and healthy! So when planning your coop space, keep in mind how many chickens you plan to keep.  Consider the breed of the chicken and adjust your plans accordingly. Finally make sure to evaluate where you will put your coop and you will have a successful and exciting adventure keeping backyard chickens!

Lamentations 3:22-23 The steadfast love of the Lord never ceases; his mercies never come to an end; they are new every morning; great is your faithfulness.

Shop this post:

  • Pre-fab Chicken Coop
  • Chicken Coop on Wheels
  • Building Chicken Coops for Dummies book
  • Electric Poultry Netting
  • Fake Wooden Eggs
  • Nest Box
  • Heated Waterer
Pintrest pin showing chickens inside and outside with the words "calculating coop and run space for happy & healthy chickens"

THE BEST TIPS TO STORE AND ORGANIZE GARDEN SEEDS

April 16, 2024 Leave a Comment

If you have been gardening for more than one year, you will understand the conundrum of figuring out the best way to store and organize all those beautiful garden seed packets of potential! 

IN THIS POST YOU WILL FIND TIPS ON…

  1. WAYS TO STORE GARDEN SEED PACKETS.
    1. Photo storage box
    2. Cardboard box, shoe box, plastic bags, paper bags
    3. Recipe box, plastic containers, photo album
    4. Mason jars, storage tins, small glass jars, spice jars, old pill bottles
    5. Pill organizers and bead storage containers
  2. WAYS TO ORGANIZE GARDEN SEED PACKETS
  3. WHERE TO STORE GARDEN SEED PACKETS.
  4. MISCELLANEOUS TIPS TO STORE AND ORGANIZE GARDEN SEED PACKETS.

This post contains affiliate links, as an Amazon Associate I earn from qualifying purchases at no extra expense to you. See my full disclosure here.

When winter seems like it will never end and the cold winter days seep into your bones. Visions of warm, bright, long summer days start dancing in your head.  You feel like spring will never come, and suddenly the garden seed catalogs start pouring in! The promise of warmer weather, endless summer days, and all that fresh garden produce begins to cheer you. You know it’s just around the corner and you can feel your bones thawing out!

If you’re like me, every new variety of vegetable or flower beckons you to try a packet of seeds. You just want to plant a little bit of this or a little bit of that. So…you start adding them to your cart, deciding that you can’t do without this or that.  Your cart fills up and you hit the “checkout” button…

Finally, your new seeds arrive in the mail! You pull out your cardboard box full of the previous years seeds and chaos ensues. It becomes obvious, you need a system to store and organize all the garden seed packets. You wonder, “What is the best way to efficiently store and organize all of these garden seed packets?”

WAYS TO STORE GARDEN SEED PACKETS.

First, you must take into consideration how many seed packets you need to store. Secondly, you must take into consideration the amount of space you have to store them.  The answer to these questions may dictate the type of seed storage containers you decide to utilize.

This past year, I had had enough! My garden seed packets were woefully unorganized. I needed to find a better way.  So, I turned to Pinterest and YouTube. I wanted to see how other gardeners are storing and organizing their garden seed packets. That’s when I saw the method of utilizing a photo organizer storage box with inner individual boxes.

Photo storage box

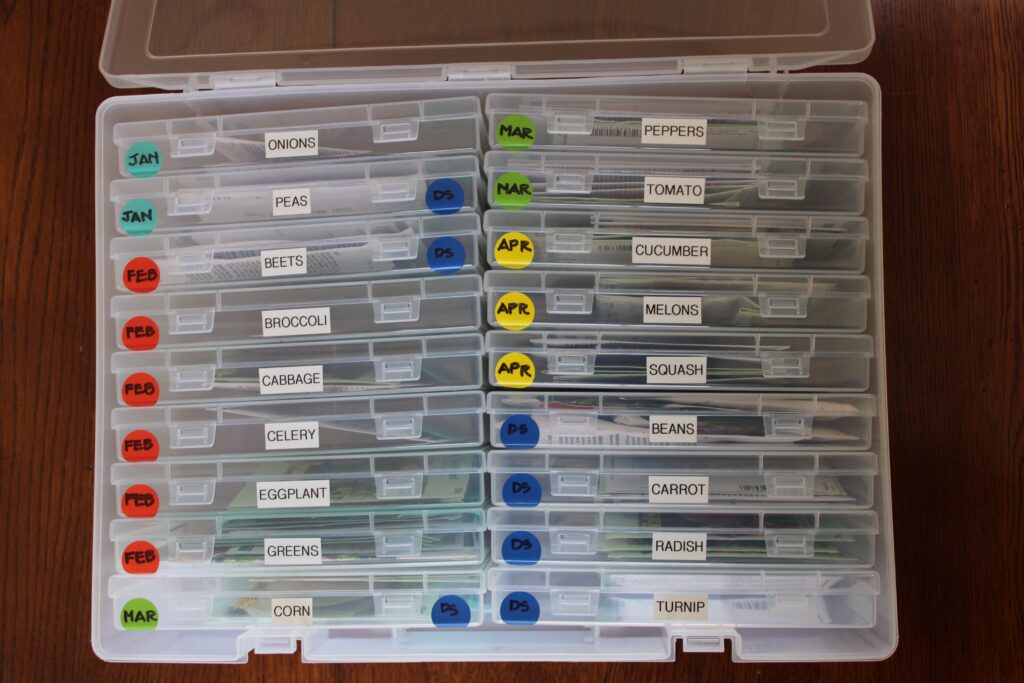
The particular photo storage box I purchased had 18, 4×6 individual inner boxes. This is a great option because:

  • The seeds are doubly protected inside two plastic boxes. It has a larger outside box and smaller 4×6 boxes that neatly fit inside the larger one. The smaller airtight containers help to protect seed viability. 
  • You can take 1 smaller container out at a time and bring it to the garden or the greenhouse. The rest of your garden seed packets stay organized.
  • It keeps the seed packets dry and dirt free.
  • Your seeds are easy to find and inventory.
  • You are able to easily see what seeds you need to order for the upcoming gardening season. No more ordering seeds that you already have plenty of.

Cardboard box, shoe box, plastic bags, paper bags

I have tried all of these methods. They did add some structure and organization to my seed packets, however, they still left my seeds unorganized.  The boxes would become a dirty mess as I would haul the whole box out to the garden.  I would try and organize them with rubber bands or ziploc bags. The seeds would come out of their packets or the rubber bands would not hold.  If the box was too big, the packets would fall over and shuffle around. A benefit is that these methods would be the most inexpensive way to store your seeds.

Recipe box, plastic containers, photo album

I feel like these also are not the best option for the same reasons listed above.

Mason jars, storage tins, small glass jars, spice jars, old pill bottles

Mason jars and storage tins would look nice on a shelf. However, they would take up a lot of space if you have a lot of seed packets to store. If you save seeds and have a lot, this is a good option.  These options can be inexpensive if you do a lot of canning and you already have mason jars. Or if you save your old pill or vitamin bottles.

Pill organizers and bead storage containers

This can be a way to organize loose seeds. However, you certainly won’t be able to fit a whole seed packet in them.  In the bead storage container you risk seeds getting mixed up.  Unless you have small ziplock bags to put in each section. In that case it may difficult to clearly label each section.

WAYS TO ORGANIZE GARDEN SEED PACKETS

For the rest of this post we will be focusing on using photo storage boxes with the 4×6 inner boxes. There are many ways to consider organizing the individual garden seed packets. You can organize them according to:

  • Different types of seeds
  • Planting dates
  • Alphabetical order
  • Planting time (spring, summer, fall, winter)
  • Vegetable seeds vs. Flower seeds

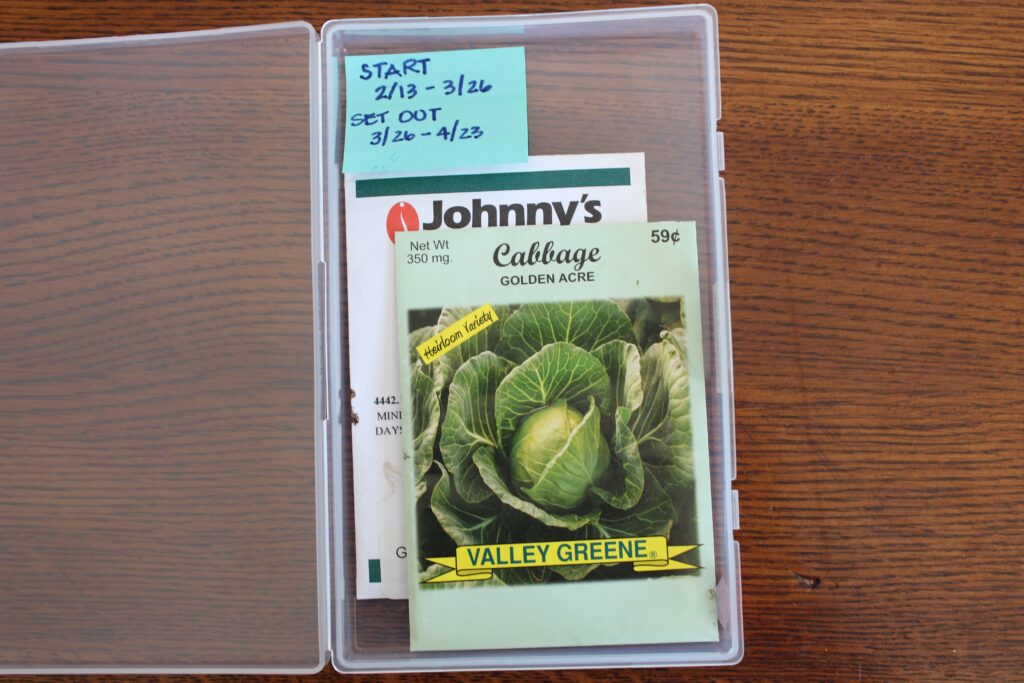
For my organizational needs, I chose to organize them alphabetically by seed type within planting date sections.  I have two larger boxes, one for vegetable garden seeds and one for herb and flower garden seeds.  Each box is organized by a colored dot sticker with the planting months for seed starting on the left side. The seed type names are labeled with tape in the middle. In some instances, I used the right side to record if they were also direct sow or perennial. On the inside of the box I placed a sticky note to remind me of the start and set out dates according to my plant hardiness zone. Some bulkier seeds (ie. peas, beans, corn), may need to stored separately in a different container.

WHERE TO STORE GARDEN SEED PACKETS.

Consider 3 things when choosing a place to store your garden seed packets. Make sure the place you choose is dry, dark, and cool. This will extend your seed viability.

First, you need to choose a dry place. Make sure that the seeds are 100% dry before storing them for next season. The relative humidity should be around 40%. 

Second, the place you choose needs to be dark.  Mostly keep them out of direct sunlight. Some ideas are a closet, cabinet, under a bed, and in the basement.  You get the idea, just make sure that you choose a place that stays dark.

Third, the best place to store your seeds needs to be a cool spot in your home. The ideal cold storage temperature is at 35-40 degrees.  However, you should aim to keep your seeds at a fairly even cool room temperature throughout the year.  The refrigerator is the ideal place to store your seeds. However, that becomes impractical because most gardeners do not have extra fridge space. Instead, just opt to store seeds that need to go through a cold stratification in the refrigerator. If you need long-term seed storage (5 or more years), definitely keep them in the refrigerator or freezer.

MISCELLANEOUS TIPS TO STORE AND ORGANIZE GARDEN SEED PACKETS.

Place the oldest seed packets on top.  You can find an expiration date on each seed packet.  However, most dates will be a sell by date that follows the companies trial dates. This way you will use your old seeds first.

When you are finished planting a type of seed, turn the container upside down. This will help you remember that you have planted that one.

Throw a couple of silica gel packets inside the larger container to help keep out any excess moisture.

If you want to store seeds that you have saved from your plants, you can make your own packet. You can easily find a template on-line to make a seed packet to hold them.

Test seed viability before planting.  This is simple.  Put a few seed on a wet paper towel. Place the paper towel inside a ziplock bag. Label the ziplock bag with the seed type, start date, and the date for germination. Place in a dark spot and make sure the paper towel stays slightly damp. Then, check the seeds to see how many have germinated in the allowed germination time.  

Keep a seed log.  Some things you may want to include are:  seed company, seed variety, date of purchase, price, date of planting, number of seeds planted, date of germination, number of plants germinated, date of harvest, and if you would plant it again.

If you are looking for the best way to organize and store your garden seed packets, try a photo storage box.  Using this will help you keep track of all the seeds packets you have at your finger tips.  When you are ready to plant your seed, it is easy to grab 1 container at a time.  This will keep them dry and contained while you are planting them. When you are ordering seeds for next gardening season, it is easy to see what you need to order.  It is well worth the time and effort it takes to set up this system.  

Genesis 1:29 And God said, “Behold, I have given you every plant yielding seed that is on the face of all the earth, and every tree with seed in its fruit. You shall have them for food.

ROTATIONALLY GRAZING DURING WINTER ON OUR REGENERATIVE FARM

April 5, 2024 Leave a Comment

Rotationally grazing our livestock on our regenerative farm can sometimes be a challenge during the winter. Especially when you are facing frigid temperatures and lots of snow.

This winter, in Kansas, has provided more snow than we have seen in years! In fact, we can’t remember a winter like this since 1998. On our regenerative farm, this has created a few challenges rotationally grazing our livestock after this past winter storm. We received about about 1 inch of rain before getting 7 inches of snow in 1 day! The temperatures dropped into the -15 degree range and there were about 35-40 mph wind gusts, which caused a lot of drifting.

Feeding the cows during winter…

We needed to push some snow drifts out of the way in order to get some fresh brome hay rolled out for the cows to graze on. In order to rotationally graze during winter, we implemented a bale un-roller that we purchased from Greg Judy. We use our 4-wheeler to pull the bale un-roller around. It works great to evenly spread the hay out over the land for the cows to graze on. As a result, this mulches the prairie and also helps to reseed the grass. Even through the frigid temperatures and the snow, our cows have remained comfortable, and happily enjoying their delicious dinner!

Watering the cows during winter…

Because we are committed to rotationally grazing our livestock year round, even during winter, we use a mobile watering system. This made it necessary to add a few amendments in order to winterize the mobile water tanks. Our watering system has been a big win in these -degree temperatures! It has remained free of ice and continues to provide our livestock with fresh clean water when they need it. This heifer is enjoying the benefits of our winterized waterer on a day when the high for the day was -3 degrees!

Moving the cows around the farm during winter…

On our farm, we also utilize an electric fence system as a permanent exterior fence and a mobile interior fence. This allows us to easily move the cattle and sheep around our regenerative farm. During the winter, It is important to keep the livestock rotationally grazing as snow and ice melt and mud ensues.

Regenerating the soil during the winter…

Keeping the livestock, fence, and water mobile helps to protect the soil from pugging. Consequently, this pugging can be difficult for the pasture to recover from. Pugging is caused when the soil is muddy and the cows come back to 1 spot in the pasture time and time again. Using a bale un-roller helps to spread out the hay, which mulches and reseeds the pasture. Finally, keeping the livestock rotationally grazing on pasture during the winter also spreads their manure out across the pasture, which helps to fertilize the soil. All of these steps make the soil microbes happy. It’s a win-win situation!

Psalm 74:17 You have fixed all the boundaries of the earth; you have made summer and winter.

PHENOMENAL ROTATIONAL GRAZING SUPPLIES FOR FENCE AND WATER SYSTEMS

November 7, 2023 Leave a Comment

Showcased at the Grass and Grain Farm and Ranch Trade Show 2023

three people at a trade show both

On November 7th and 8th, we had the opportunity to exhibit our Timeless Fence and Powerflex watering systems at the Grass and Grain Farm and Ranch Trade Show in Manhattan, KS. The Grass and Grain is a local newspaper in rural Kansas and surrounding states since 1954. We had a great time meeting and making connections with many farmers who were interested in learning how to manage their livestock in a more efficient way. 

Why we chose to rotational grazing supplies from Timeless Fence

When we decided to switch our farm from continuous grazing to a rotational grazing system, it was clear that we needed to re-do all the fence on our property.  The whole farm had a barbwire fence that was breaking down in places. It was time for a change. We did our research to see what other graziers were using.  That’s when we found Timeless Fence. 

The advantages of Timeless Fence

trade show banner with electric fence pictures
  • It is cost effective to use Timeless Fence. When you compare it to using traditional steel t-posts and wood posts it is less expensive.
  • The posts consist of recycled materials that are UV protected with a life expectancy of 40 years.
  • You do not need electric fence insulators. High-tensile wire and electric braid are directly ran through the post.
  • It is easy to install and versatile.  Timeless pre-drills holes every three inches along the post to reduce installation time.
  • The fence is strong yet flexible and never rusts and rots. The fence posts absorbs shock and bounces back, making it virtually impossible to break.
  • It makes a beautiful fence for your property.  The white-posted border fence looks idyllic along the road.  We have received complements on how nice our fence looks.

Why we chose rotational grazing supplies from Powerflex watering systems

On our farm we have access to several ponds across the property.  However, since we believe in the benefits of rotationally grazing our livestock, we needed access to water in each smaller paddock. Again, we did our research and decided to go with Powerflex rotational grazing supply company.  Using Powerflex has proved to be a great decision.  This past winter when the temperature dipped into -15 degrees with -35 degree wind chill, our cattle had access to fresh, ice-free water all winter long. 

We stand behind these two superior companies.  We are an authorized reseller for Timeless Fence Systems and a partner for Powerflex Rotational Grazing Supply.  If you have questions or supply needs, please e-mail us at info@prairetoforkfarm.com or call us at 785-410-7855 for all your fencing and water supply needs!

sidebar

Blog Sidebar

Let’s Connect

  • Email
  • Facebook
  • Pinterest

So glad you are here!

A Man and a Woman at Sunset on a rolling prairie

Welcome to Prairie to Fork Farm! Learn more about our journey to regenerative farming and producing wholesome food here.

Around The Farm Blog

  • IDEAS FOR CHOOSING THE “BEST” FENCE FOR CATTLE (AND SHEEP)
  • HOW MUCH COOP AND RUN SPACE DO MY CHICKENS NEED?
  • THE BEST TIPS TO STORE AND ORGANIZE GARDEN SEEDS

Archives

  • April 2024
  • November 2023

Categories

  • Around the Farm Blog
  • Chicken
  • Grass-Fed Beef
  • Livestock
  • Pastured Poultry
  • Pigs
  • PowerFlex Fence
  • Regenerative Grazing Management
  • Regenerative Grazing Supplies
  • Sheep
  • The Journey
  • Timeless Fence Systems
  • Uncategorized
  • Water Systems for Grazing
  • Wholesome Food